Showing posts with label crafts. Show all posts

Tuesday, January 05, 2016

DIY Notebook Makeover

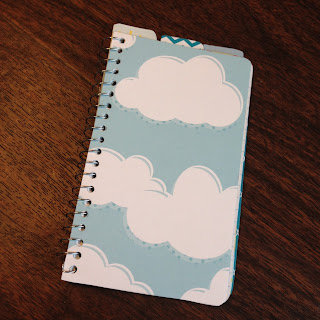
Today I want to show you how you can turn an ordinary spiral notebook into a really neat personalized notebook.


All you need are a cheap spiral notebook, some scrapbook paper, pliers, a small hole punch, scissors, and a pen or pencil.


Start with the spiral notebook (any size). I chose a small memo notebook.

Take the pliers and carefully unbend the wire at one end of the notebook. It helps to make it curved. Then simply spin the wire until it twists out of the notebook pages leaving the pages completely undone.


Using the cover page as a template copy the shape and holes onto a piece of scrapbook paper. Cardstock works the best, but I've also glued a thinner piece to the cover when I didn't have cardstock paper on hand.


You can get creative and also use the cover to make decorative divider pages, too.


Another thing you can add are envelopes for storage. I found a great envelope template here that I shrunk in size to fit my notebook.


Here's one that I made out of cardstock scrapbooking paper.


Next, line everything up and punch holes in all the pages you are going to add to your notebook.  It helps to use a pen/pencil and copy the location of the holes from your cover page as a template. Notice the punch is smaller at 1/8" circle size not a standard hole punch size.


Once everything is punched,  just line it all up in the order you want it and fish the wire back through the holes. Continue to twist the wire until it reaches the opposite end. Then using the pliers gently bend the wire down to stop the pages from unwinding.

All done.

You can get really creative by adding tabs, pockets, divider pages and more. Plus, this works on any type of spiral notebook, so long as you can bend the wire and put it back once you're done. It's a wonderful way to decorate all those $.10 notebooks from Walmart during Back to School sales that so many of us bought.


I'd love to see how you decorate your notebooks. Feel free to share by leaving a comment below.

Thursday, October 24, 2013

Rubber Band Bracelets


These rubber band bracelets are all the rage among kids lately. Today I bought some of the bands at my local craft store and my kids have gone crazy and made a bunch already.

First things first. These are pretty tiny and should be kept away from little ones and animals.

These are really easy to make. Basically you are just interlocking the little rubber bands together.  They can be made in any color combination. We did our favorite football team (Raven's), their school colors, camouflage, rainbow, even holiday colors.

I have to say this is a really fun and easy craft for elementary school aged kids and older. Another nice thing to note is that it's not expensive. All the supplies to make a bunch of bracelets only cost $5. Plus they don't take a lot of room or require any tools.

You can find these rubber band bracelet supplies at your local craft store or on Amazon.

Update:
I just found this amazing link to A.C. Moore.com that has 2 dozen different patterns to create a variety of different rubber band bracelets.  These are also called stretch band bracelets or Rainbow Loom bracelets. So have fun and share some of your creations.

Thursday, October 10, 2013

DIY Halloween Costume Tutorials

Today I thought I would share a couple wonderful Halloween costume tutorials. Just in case your young ones haven't already decided what to dress up as for trick or treating.

1. Lego
Source

2. Donut
Source


3. Alice in Wonderland
Source


4. Octopus
Source

5. Hot Air Balloon Ride
Source

These were a couple of our favorites. What is your favorite, most creative costume?

Monday, August 05, 2013

Personalized Game of Guess Who

My kids had received 2 games of Guess Who, a while back, in a kid's meal from one of their favorite restaurants. They played it once and then it was left sitting for a couple months. Normal unfortunately for kid's meal toys in my house.

I was trying to find fun activities for my kids while we are on vacation next week and wanted to surprise them with a personalized game for them to play.


We had a portable version of the game, but you could easily do this with the regular size game and it would work much better. These pictures are so tiny, but I made it work.


I made one with all our immediate family members. I also made one that has a bunch of Harry Potter characters because we are big Harry Potter fans.


I collected all the photos I wanted to use in a folder on my computer than selected the ones to print. Then I chose "Contact Sheet" or "Index" on the print settings. I will print out a bunch of thumbnail size pictures. I still needed to shrink them a bit so I printed the page out 55% instead of 100% size. You can obviously make the photos whatever size you need.

Hope this inspires some of you to create your own personalized games for your family.

Friday, April 05, 2013

Freebies on Friday - April 5, 2013

This week I found lots of neat stuff. First I included a couple ebooks. These cover some topics of interest to me. I love organizing and gardening, but you may not know I'm a massage junkie. Every year I get a professional massage for Christmas or my birthday and beg my hubby for a back massage on a regular basis. If money were no object I would definitely go to massage school because of how relaxing it feels.

Anyways, I also included an ebook on "bugging in". Don't freak out. I think it really applies to a wide range of situations - not just Zombie Apocalypse. LOL

For example, I live on the East Coast of the US and we face hurricanes, powerful windstorms and snow storms and we never know when we will be forced to stay home for days on end because of a storm. This book could help deal with no power, no water, what about food, blocked roads because of downed trees, etc. Emergency situations don't have to be man made they can be natural as well, so for this book keep an open mind. :)

Bugging In: How to Hunker Down and Survive in an Emergency Situation (Stay Alive)

Stress Free Organization For Your Child: How To Get Your Child Involved In Cleaning And Organizing Their Spaces While Still Having Fun

Therapeutic Shiatsu Massage for the Beginner

Smart Gardening: How To Grow Your Best Vegetable Garden (Gardening Essentials Series)


In addition to the ebooks above it like to include other fr*ee stuff I've found online throughout my searches. This week I'm including these really cute American Girl doll  patterns.

My youngest loves her 18" dolls and so I'm always hunting for patterns to make her more clothes. Here are a couple good and fre*e ones I found online.


American Girl Doll - Royal Bridesmaid Dress Pattern
This is adorable and fits 18" dolls.  Easy to understand instructions with photos.

18" doll T-Shirt Pattern
Love this one it has little ruffle going down the front which is optional.

Historical Dresses like those in the American Girl Doll Catalogs

Adorable Drawstring Dress
This is soo cute! I've made this one a couple times. There is also a link on the page in case you don't want to go through the shopping cart. It takes you directly to the PDF.

Hope you enjoyed the fun things I've found today. See you Monday!

Tuesday, March 12, 2013

Microcrafts Tiny Treasures to Make and Share Review


I recently went to my local library and found this awesome book. Microcrafts: Tiny Treasures to Make and Share written by Margaret McGuire, Alicia Kachmar, and Katie Hatz.


It includes 25 different micro crafts. These are super tiny crafts like the cat in the photo on the book.

My favorite project was the mini books. I've always been obsessed with notebooks and journals and thought this would be a really fun project. They are so tiny you can fill them with quotes, pictures you draw or if you are really crafty - make a microscopic scrapbook.

Well, I read the directions and followed them step by step and discovered it was really easy. Here is the first book I have ever made. Notice it isn't much bigger than a penny.


I used one sheet of printer/copier paper, a tiny piece of scrapbooking paper, a small piece of cardboard (cut from cereal box), some regular sewing thread, a push pin and a glue stick. It took me about an hour to actually make the first one only because I didn't want to mess up. I also let it sit overnight to let the glue dry. Actually working on it took very little time at all. Which is great for someone like me who likes instant results.

I've also made a couple teddy bears from their book and a few more books. My daughter gave a couple teddy bears out as presents for Christmas. They are small enough to fit in a pocket and carried around undetected by others.


The teddy bears can be made out of a very small piece of felt. Any color or pattern. I'm thinking about making a camouflage bear for my son. 

I have to say this has got to be the best craft book I've found in a long time. I've actually completed a couple of the projects in the book unlike so many books I simply browse through. These projects are something I can make with my kids and we love how tiny they are.

* Just an FYI - the link above is my affiliate link for the book on Amazon, but feel free to check your local library first. If you love the book like I do you can always go back and buy it later.

Monday, October 15, 2012

Mini Scrapbook Photo Album


Last year my youngest would cry on the bus. She would miss her mom and dad, but she especially missed her big sister who went off to middle school and couldn't ride with her and walk her to class anymore.

So I found these vertical badge holders at the Dollar Tree (my FAVE store). Though the also sell them at Wal-Mart and Office Depot.

I took a couple pieces of scrapbooking paper and glued a photo of each family member along with their name on them. Creating mini scrapbooking pages. 

The pack of 10 badge holders can hold 20 different photos - so you can add grandparents, extended family, pets, even favorite toys. 

Once the mini scrapbooking pages were done and put into the badge holders I secured them together with a binder clip that I found at Wal-Mart.

Plus being covered in the hard plastic badge holders protects the photos so the album will last even when played with by little fingers everyday.

Tuesday, June 22, 2010

Crafts - Avoid the Chaos

I'm a craft supplies lover. I love buying yarn, scrapbooking paper, fabric, you name it. The only problem, well one of the problems is that I can't remember what I bought. I go into my room and find that I have 3 of the exact same thing.  Do you have the same problem?

The first thing to do is to take an inventory of all the craft supplies you have on hand. Then look it over prior to going into a craft or fabric store.

Next, organize all the different items - by project or with like items.  Whichever is easiest for you.

Well I do both and that's what works for me. I like seeing all the possible projects that got me inspired enough to buy the items in the first place. I store fabric projects together. For example: quilts, purses, pillows, etc.


As for scrapbooking I store all my supplies together. There are just too many bits and pieces to sort into projects. Too many projects that use the same items for example scissors and brads.

My point is to figure out what works for you. You need a solution that will help you find and remember what you have on hand and also inspire you to create.

Monday, April 05, 2010

Mommytime Monday - Cool Uses for Plastic Bags

What do you do with all those plastic grocery and shopping bags? Do you reuse them? What about recycle them?  Why not make something out of them?

Here's a fun craft project!


Learn how to make a really cool recycled bag. Here is one really incredible tutorial on Etsy.com

http://etsylabs.blogspot.com/2007/05/long-overdue-fusing-plastic-bag.html


Here's another great tutorial using plastic bags from an amazing blogger. She shows you how to make iron-on decals for t-shirts, bags, etc. all from plastic bags. The possibilities are endless. 
http://www.filthwizardry.com/2010/03/iron-on-decals-from-plastic-shopping.html

There are lots of ways to use this project. Here are just a few ideas:
* Mother's Day
* Party favors (goody bags or t-shirts)
* Green Recycled shopping bag
* Cute decals for everyday clothes
* Decorations for curtains in children's rooms or for the holidays
 

Monday, March 15, 2010

Mommytime Monday - Show Off Your Child's Work

Boy do kids make a lot of drawings when they are young. Aside from sticking them up on the refrigerator, making a book with them, or maybe turning your garage into an art gallery what are you supposed to do with all those wonderful pieces of art?


Using these really easy printable iron on sheets you can make almost anything. Here are just a few of the really neat things you can make:

  • Tote bags
  • T-shirts
  • Sweatshirts
  • T-shirts for stuff animals or dolls
  • Aprons

Any of these would be perfect for:
  • Teacher's gift
  • Christmas presents
  • Baby shower favors
  • Bridal shower favors
  • Mother's Day/Father's Day, etc.
  • Get well gift
  • Birthday present
  • lots more.
It's really easy to do. I made this simple tote bag with a drawing my son did at school. I scanned the drawing into my computer, but places like Staples and Office Depot can do that for you.

Then simply print out the drawing onto the special printable iron on paper which is available at almost every craft store and even some major department stores. If there is writing on the drawing you will need to print out a mirror image of the drawing.

Take the newly printed image and place the image face down on the shirt, tote, etc. you want to personalize. Iron according to the direction on the package.

Let cool and peal off the paper. Your item is now done and ready to be used.

Tuesday, January 13, 2009

Keep the Heat in with Door Stoppers


Since most of the country has been hit with a major cold spell, I wanted to show a very easy way to keep some of that heat in your home.


To make one for your home. Simply measure the width of your door or window. Now cut a piece of fabric to the width of your door or window by 5" high. Fold the fabric in half length wise with the right sides together. Sew with a straight stitch or by machine along the long edge. Leaving the end open. Turn right side out and stuff with pillow stuffing or rice. Hand sew up the remaining open end.


Another option to going out and buying fabric is to recycle old fabric from old sheets, blankets, jeans or any other material you no longer need.